
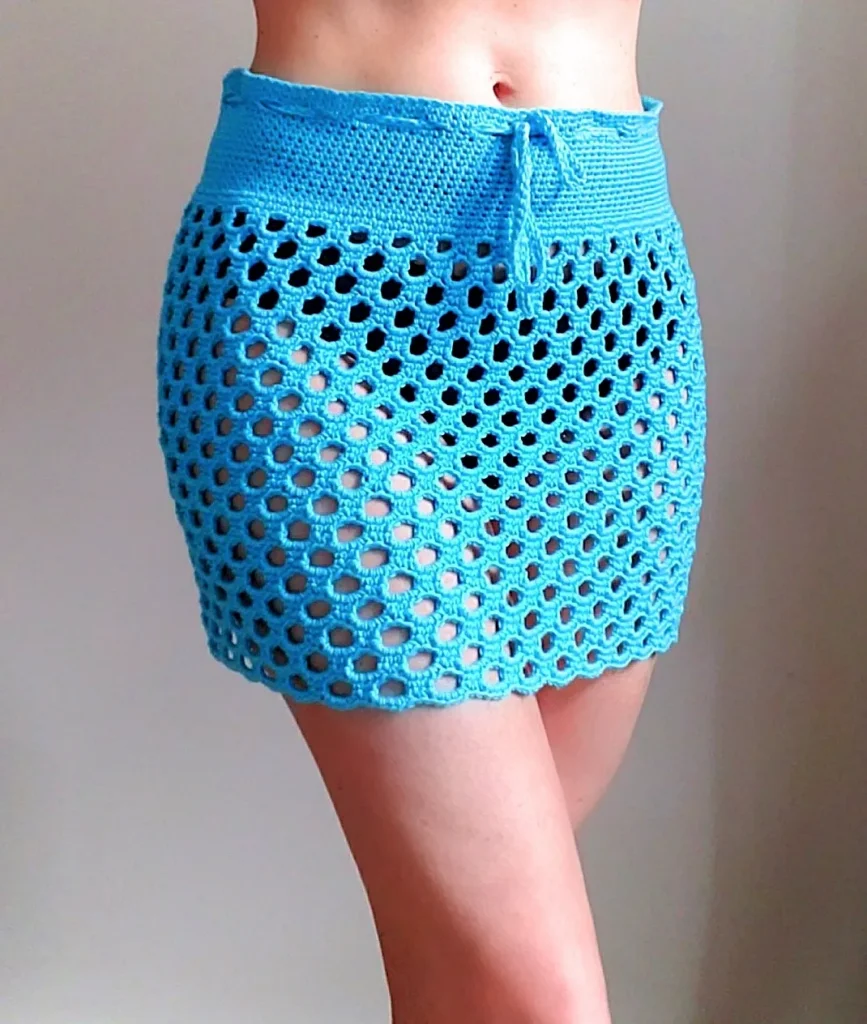
The Playful Summer Beach Skirt Crochet Pattern
If you’re looking for the ultimate handmade vacation wardrobe piece, this is it. The Playful Summer Beach Skirt is about to become your new favorite project! Indeed, I designed this skirt with long, sun-drenched days in mind. It is light enough to toss over a swimsuit, yet stylish enough to wear to a seaside lunch.
The best part about this project is how mindless it is to stitch up. Once you get past the initial setup, the main body is just a simple two-round repeat. It is the perfect project to work on while chatting with friends or lounging by the pool. You can easily relax without losing your place in a complex chart!
Finding Your Perfect Fit
Also, this customizable crochet pattern easily fits every body type. The math stays simple whether you are making a tiny toddler version or a floor-length maxi for yourself. It is a great “measure to fit” project that takes the stress out of meeting a specific gauge.
The directions cover sizes XXS to XXXL (fitting waist sizes 25″ to 40″), but you can easily make any size. Since this design is fitted through the waist, I recommend sizing up if your hips are much larger than your waist. This ensures the skirt slides easily over your hips. Don’t worry if the waist is a bit big. The handy drawstring will keep it perfectly secure, while the bottom flares out into a loose, flowy drape.
A Quick Note for Experienced Crocheters
One last note! I will repeat “place marker” and “do not slip stitch” quite a lot. I write my patterns so crocheters of any skill level can follow along. If you are highly experienced, it might feel a bit repetitive, but it keeps the pattern stress-free for beginners.
So grab your hook and here is the free crochet pattern!
MATERIALS
– Fine (2) weight yarn. I used 2 skeins of Premier Cotton Fair in Turquoise for the XS.
– Size F (3.75 mm) crochet hook or size that obtains the correct gauge.
– Stitch markers.
GAUGE
19 sc = 4 inches
SIZES
XXS – waist = 25″, hips = 38″
XS – waist = 27″, hips = 41″
S – waist = 29″, hips = 44″
M – waist = 31.5″, hips = 47″
L – waist = 33.5″, hips = 50.5″
XL – waist = 35.5″, hips = 53.5″
XXL – waist = 38″, hips = 57″
XXXL – waist = 40″, hips = 60″
If you want to make a smaller size just decrease the beginning chain in multiples of 10 starting with the smallest chain shown which is 120 & follow the pattern as written. Same goes if you want to make it larger. Increase the largest chain shown which is 190 in multiples of 10. Each multiple of 10 will change the waist size about 2 inches and the hip size about 3 inches.
DIRECTIONS:
Starting at the top of the skirt:
Ch 120(130,140,150,160,170,180,190) = XXS(XS,S,M,L,XL,XXL,XXXL)
FOUNDATION ROUND: Join in the round with a slip stitch in the first ch, sc in same ch as the slip stitch (place marker for first sc and carry marker up each round), sc in each ch around. Do not join with a slip stitch at the end of the round. 120(130,140,150,160,170,180,190) sc
WAIST ROUNDS:
1 & 2: Sc in the first sc (place marker for first sc), sc in each sc around. Do not slip stitch at the end of the rounds.
3: Sc in the first sc (place marker), *ch 3, skip the next 3 sc, sc in each of the next 2 sc; repeat from * around to the last 4 sc, ch 3, skip the next 3 sc, sc in the last sc. Do not slip stitch at the end of the round. (The ch 3 spaces made will be used for the drawstring).
4: Sc in the first sc (place marker), work 3 sc in the first ch 3 space, sc in each of the next 2 sc, *work 3 sc in the next ch 3 space, sc in each of the next 2 sc; repeat from * around to the last ch 3 space, work 3 sc in the last ch 3 space, sc in the last sc. Do not slip stitch at the end of the round. 120(130,140,150,160,170,180,190) sc
5: Sc in the first sc (place marker), sc in each sc around. Do not slip stitch at the end of the round.
Repeat round 5 until the piece measures 3 inches from the very beginning.
INCREASE ROUND: – Sc in the first sc (place marker), 2 sc in the next sc, *1 sc in the next sc, 2 sc in the next sc; repeat from * around. 180(195,210,225,240,255,270,285) sc
MAIN BODY ROUNDS (There is a picture guide for rounds 2 – 4 at the end of the pattern):
1: Sc in the first sc & in each sc around ending slip stitch in the first sc.
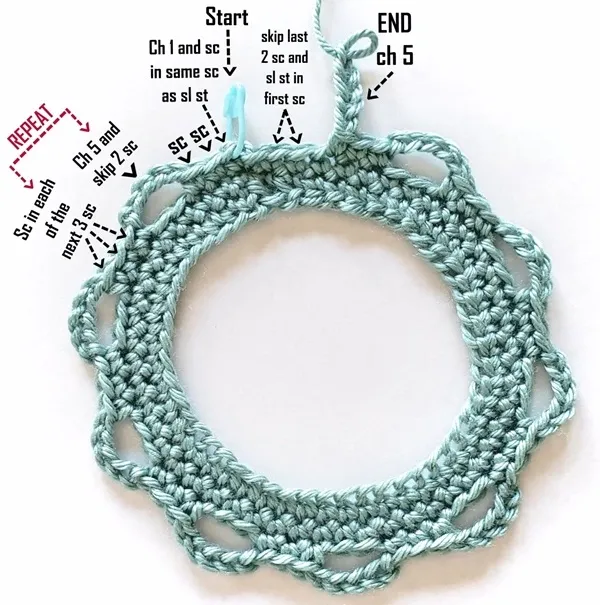
2: Ch 1, sc in the same sc as the slip stitch (place marker), sc in each of the next 2 sc, *ch 5, skip 2 sc, sc in each of the next 3 sc; repeat from * around to the last 2 sc, ch 5, skip the last 2 sc, slip stitch in the first sc.
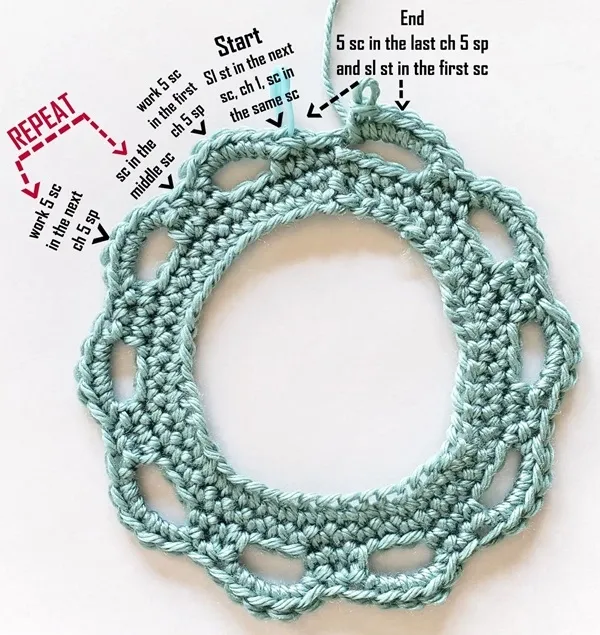
3: Slip stitch in the next sc, ch 1, sc in the same sc as the last slip stitch (place marker), skip the next sc, work 5 sc in the first ch 5 space, *sc in the middle sc of the next 3 sc group, work 5 sc in the next ch 5 space; repeat from * around ending slip stitch in the first sc.
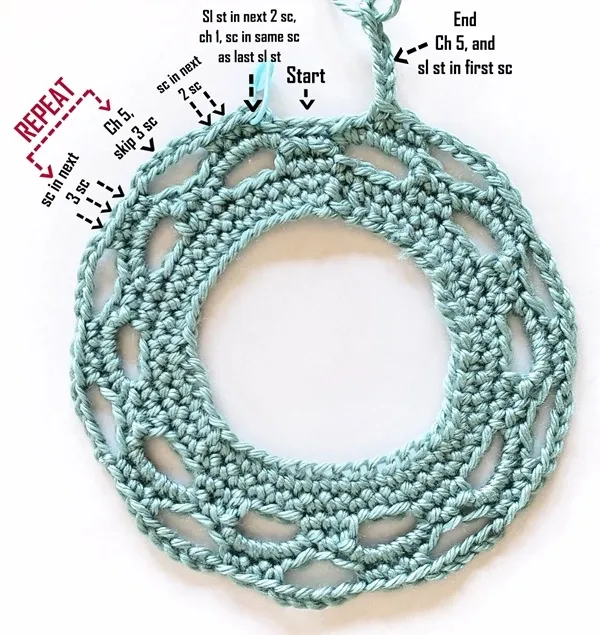
4: Slip stitch in each of the next 2 sc, ch 1, sc in the same sc as the last slip stitch (place marker), sc in each of the next 2 sc, *ch 5, skip 3 sc, sc in each of the next 3 sc; repeat from * around to the last sc & the beginning slip stitches, ch 5, skip the last sc & the beginning slip stitches, slip stitch in the first sc.
Repeat rounds 3 & 4 until you reach your desired length ending with row 3 & fasten off. The length shown in the picture is 14 inches measured from the very beginning of the waist.
DRAWSTRING:
Ch 220(240, 260, 280, 300, 320, 340, 360) = 46”(50”, 55”, 60”, 63”, 67”, 72”, 76”) in length
– Slip stitch in the 2nd ch from hook and in each ch across & fasten off.
Weave the drawstring through all the ch 3 spaces made in round 3 of the waist section.
Here are some helpful pictures of the main body rounds (Note: They do not show the final slip stitch at the end of the round).
You’re all done and I hope you love your new Playful Summer Beach Skirt. I would love to see all your finished projects, so please tag me on Instagram!