
Celestial Motif Table Runner: A Free Crochet Pattern
If I am not designing crochet or knitting patterns, my other true love is interior design. Since I live on the beach, my home decor is definitely coastal with a bohemian twist. I also adore mixing in vintage, old-fashioned pieces. In fact, I still keep a crocheted doily that my grandmother made over 60 years ago on my nightstand—it’s a treasure I will keep forever!
One day, I spotted a beautiful macrame table runner in a magazine and immediately thought, “I can crochet something like that!”
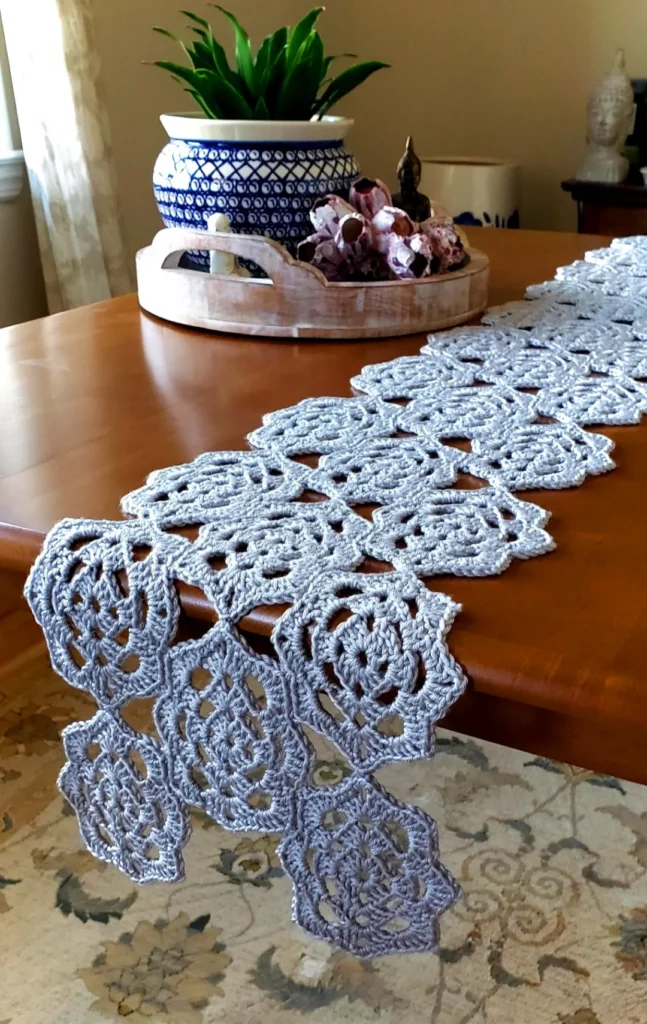
I remembered a unique lace motif I had designed a while back and decided to experiment. I wanted to create a boho crochet table runner that felt fresh and stylish, not dated. I ended up absolutely loving the result! As you can see in the picture, it fits my coastal-boho decor perfectly and adds a stunning handmade touch to the living room. I was a little nervous about what my friends would think, but it has received rave reviews from everyone.
I am so excited to share this free crochet table runner pattern with you all!
Why You’ll Love This Motif Pattern
- Quick to Work Up: The individual motifs consist of only 4 rounds, making them incredibly fast and easy to crochet.
- Highly Customizable: My table is on the shorter side, so the runner pictured is 54 inches long (requiring 35 motifs). You can easily add or subtract motifs to fit your own dining table or dresser.
- Bonus Coaster Idea: I used a single standalone motif as a matching coaster!
A Quick Maker’s Note: While square motifs are a breeze to join, these intricate shapes require a bit more patience to sew together. There are also quite a few ends to weave in, but if you’re like me, you might actually find that part relaxing! If you discover a clever alternative joining method, I would love to see it.
Pattern Details & Materials
Before you dive into the directions, here is everything you need to build your own crochet motif table runner.
Materials
- Crochet Hook: Size G/7 (4.50 mm)
- Yarn: Light (3) weight yarn. (Pictured: 2 balls of Loops & Threads Joy DK Tricot Double in the shade Cloud)
- Notions: Tapestry needle for weaving in ends
Gauge & Sizing
- Gauge: 16 sc = 4 inches
- Motif Size: Each individual motif measures approximately 4 inches by 4.5 inches.
- Finished Size: 54 inches long (Using 35 motifs total)
Assembly Layout
Important Note: This runner is constructed using 3 parallel strips of motifs. To create the beautiful staggered edges seen in the photo, the middle strip will have one less motif than the two outside strips.
Directions
Ch 6 & join with a slip stitch in the first ch to form a ring.
ROUNDS:
1: Ch 3 (counts as 1st dc now and throughout), 2 dc in the ring, (ch 3, 3 dc) in the ring 3 times, ch 3, slip stitch in the top ch of the beginning ch 3.
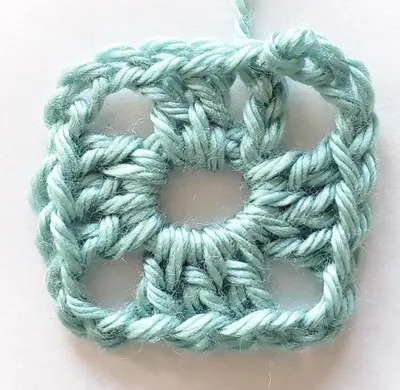
2: Slip stitch in each of the next 2 dc, slip stitch in the first ch 3 space, ch 3, (2 dc, ch 3, 3 dc) all in the same first ch 3 space as the slip stitch, ch 3, 3 dc in the next ch 3 space, ch 3, (3 dc, ch 3, 3 dc) all in the next ch 3 space, ch 3, 3 dc in the next ch 3 space, ch 3, slip stitch in the top ch of the beginning ch 3.
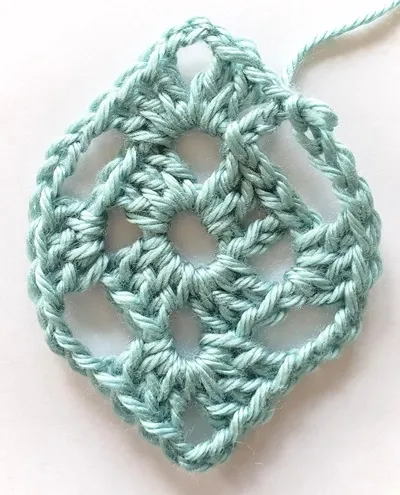
3: Slip stitch in each of the next 2 dc, slip stitch in the first ch 3 space, ch 3, (2 dc, ch 3, 3 dc) all in the same first ch 3 space as the slip stitch, (ch 3, 3 dc in the next ch 3 space) 2 times, ch 3, (3 dc, ch 3, 3 dc) all in the next ch 3 space, (ch 3, 3 dc in the next ch 3 space) 2 times, ch 3, slip stitch in the top ch of the beginning ch 3. (It will probably curl at the end of this round which is normal).

4: Sc in the same ch as the slip stitch (place a marker for 1st sc), sc in each of the next 2 dc, 3 sc in the first ch 3 space, sc in each of the next 3 dc, (3 dc, ch 2, 3 dc) all in the next ch 3 space, *skip the next dc, sc in the next dc, skip the next dc, (3 dc, ch 2, 3 dc) all in the next ch 3 space; repeat from * 1 more time, sc in each of the next 3 dc, 3 sc in the next ch 3 space, sc in each of the next 3 dc, (3 dc, ch 2, 3 dc) all in the next ch 3 space, **skip the next dc, sc in the next dc, skip the next dc, (3 dc, ch 2, 3 dc) all in the next ch 3 space; repeat from ** 1 more time, slip stitch in the first sc & fasten off.
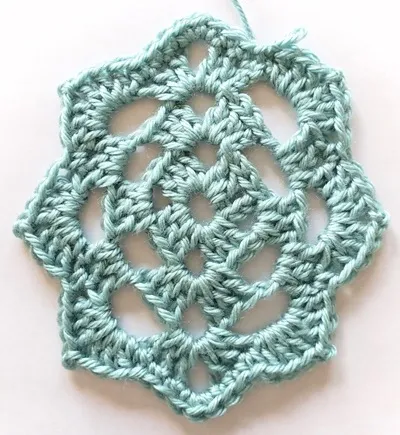
Your first motif is done! Make as many as you need and here is how to sew them all together.
The table runner will have three strips. For mine I had 12 motifs for each outside strip and 11 for the middle one. Since it’s an odd shape sewing can be a bit of a challenge but here is how I did it.
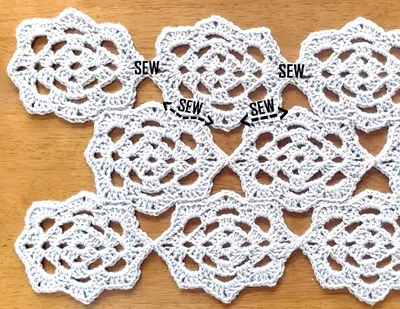
Please ignore the non-blocked pieces in the picture! This was a trial piece and I did it very quickly. Once blocked and sewed the runner comes out really pretty. Again, maybe some of you may have an easier or more creative way to do it and I would love to hear any suggestions! Happy crocheting & I hope you love it as much as I did.