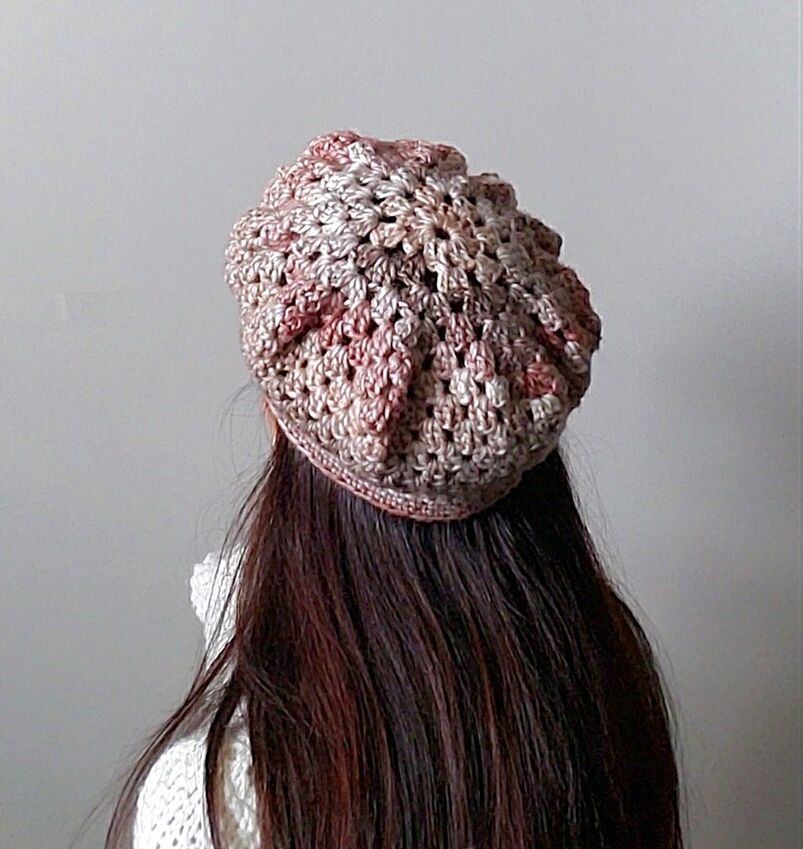
The Granny Crochet Beret Hat Pattern
Tired of the same old crochet beanies? Ready to add a touch of Parisian chic to your wardrobe? Then grab your hook, because the Granny Crochet Beret Hat is the perfect project for you!
It works up like lightening, it’s super cozy, and it gives the beret a cool, modern texture. The Granny Crochet Beret Hat is crocheted in the round using lovely little clusters of double crochets (the granny stitch), which creates a soft, draped fabric that falls just right.
Why You Need This Beret in Your Life!
1: Instant Gratification: You need a gift for a friend tomorrow? You have a random skein of yarn that needs a purpose? The Granny Crochet Beret Hat is your superhero.
2: Yarn Stash Buster: It’s a great project for that single, lonely ball of yarn that’s too nice to throw out but not enough for anything big.
3: Beginner – Friendly Pattern: It primarily uses the chain (ch) and double crochet (dc) stitches, which are the foundational stitches of crochet. If you can make a granny square, you can make this beret! It’s repetitive enough to be relaxing but engaging enough to keep you motivated.
So, ditch that blanket project (just for tonight!) and grab your hook. The free pattern for the Granny Crochet Beret Hat is waiting for you. Happy hooking, you stylish granny, you!
WHAT YOU WILL NEED:
- Medium weight yarn. In the picture I used about 350 yards of Caron Blossom Cakes in Cabana.
- Size H (5 mm) crochet hook.
GAUGE: 14 single crochet = 4 inches.
Please take the time to check your gauge because there is only one size (the hat band will measure about 17 inches in circumference).
** All my patterns are written in standard American terms**
DIRECTIONS:
Starting with the crown ch 6 & join with a slip stitch in the first ch to form a ring.
ROUNDS:
1: Ch 3 (counts as the first dc throughout the pattern), work 1 dc in the ring, *ch 1, work 2 dc in the ring; repeat from * 6 more times, ch 1, slip stitch in the top ch of the beginning ch 3. (You will have 8 groups of 2 dc & 8 ch 1 spaces)
2: Slip stitch in the next dc, slip stitch in the first ch 1 space, ch 3, work 2 dc in the same ch 1 space, *ch 1, skip the next 2 dc, work 3 dc in the next ch 1 space; repeat from * around ending ch 1, slip stitch in the top ch of the beginning ch 3. (You will have 8 groups of 3 dc & 8 ch 1 spaces)
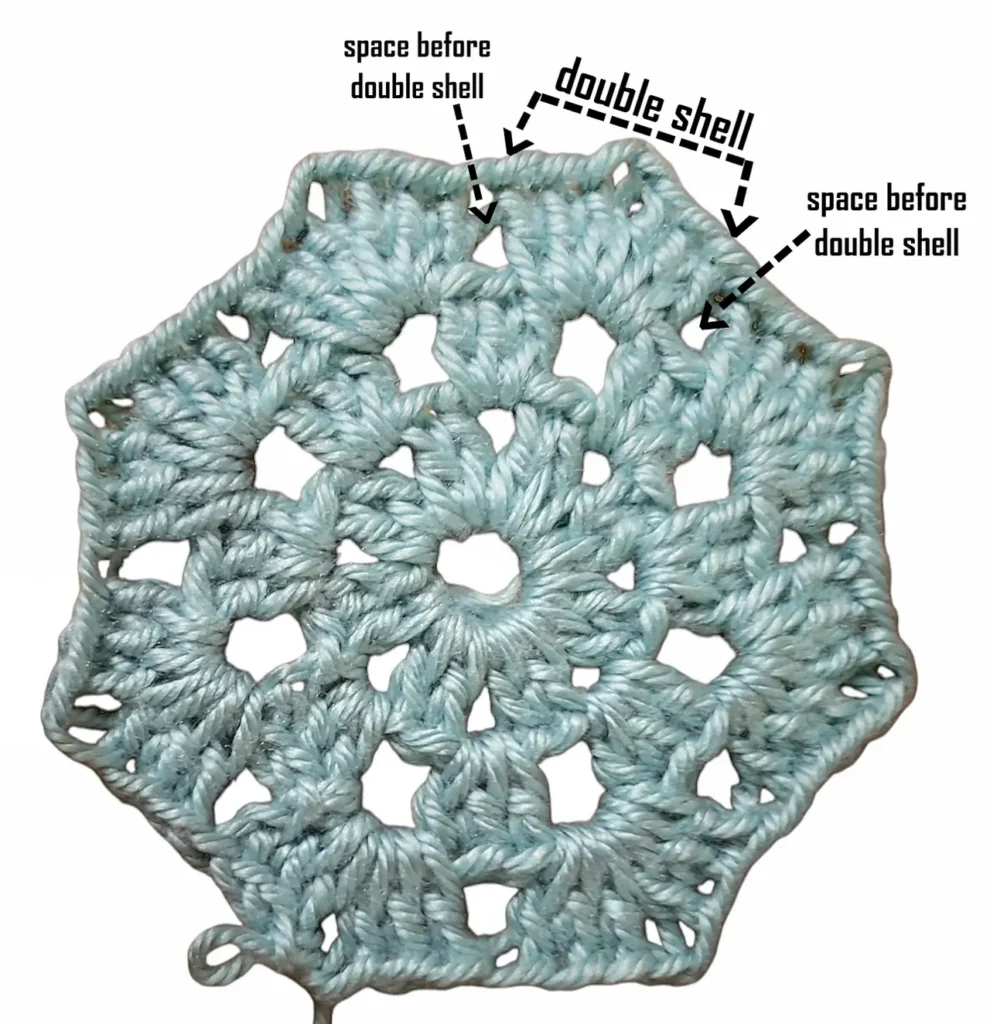
3: Slip stitch in each of the next 2 dc, slip stitch in the first ch 1 space, ch 3, work (2 dc, ch 1, 3 dc) in the same ch 1 space (double shell made), *skip the next 3 dc, work (3 dc, ch 1, 3 dc) in the next ch 1 space; repeat from * around ending slip stitch in the top ch of the beginning ch 3. (You will have 8 groups of double shells)
4: Slip stitch in each of the next 2 dc, slip stitch in the ch 1 space of the first double shell, ch 3, work (2 dc, ch 1, 3 dc) in the same ch 1 space, skip the next 3 dc, work 3 dc in the next space before the double shell (see picture below if you are confused as to what space I am referring to), *skip the next 3 dc, work (3 dc, ch 1, 3 dc) in the next ch 1 space of the double shell, skip the next 3 dc, work 3 dc in the next space before the double shell; repeat from * around ending slip stitch in the top ch of the beginning ch 3. (You will have 8 double shells & 8 groups of 3 dc)
5: Slip stitch in each of the next 2 dc, slip stitch in the first ch 1 space, ch 3, work (2 dc, ch 1, 3 dc) in the same ch 1 space, (skip the next 3 dc, work 3 dc in the next space) 2 times *skip the next 3 dc, work (3 dc, ch 1, 3 dc) in the next ch 1 space of the double shell, (skip the next 3 dc, work 3 dc in the next space) 2 times; repeat from * around ending slip stitch in the top ch of the beginning ch 3. (You will have 8 double shells & 16 groups of 3 dc)
6: Slip stitch in each of the next 2 dc, slip stitch in the first ch 1 space, ch 3, work (2 dc, ch 1, 3 dc) in the same ch 1 space, (skip the next 3 dc, work 3 dc in the next space) 3 times *skip the next 3 dc, work (3 dc, ch 1, 3 dc) in the next ch 1 space of the double shell, (skip the next 3 dc, work 3 dc in the next space) 3 times; repeat from * around ending slip stitch in the top ch of the beginning ch 3. (You will have 8 double shells & 24 groups of 3 dc)
7: Slip stitch in each of the next 2 dc, slip stitch in the first ch 1 space, ch 3, work 2 dc in the same ch 1 space, (skip the next 3 dc, work 3 dc in the next space) 4 times, *skip the next 3 dc, work 3 dc in the next ch 1 space of the double shell, (skip the next 3 dc, work 3 dc in the next space) 4 times; repeat from * around ending slip stitch in the top ch of the beginning ch 3. (You will have 40 groups of 3 dc)
8: Slip stitch in each of the next 2 dc, slip stitch in the first space, ch 3, work 2 dc in the same space, *skip the next 3 dc, work 3 dc in the next space; repeat from * around ending slip stitch in the top ch of the beginning ch 3. (You will have 40 groups of 3 dc)
9: Slip stitch in each of the next 2 dc, slip stitch in the first space, ch 3, work 1 dc in the same space, *skip the next 3 dc, work 2 dc in the next space; repeat from * around ending slip stitch in the top ch of the beginning ch 3. (You will have 40 groups of 2 dc)
10 – 12: Slip stitch in the next dc, slip stitch in the first space, ch 3, work 1 dc in the same space, *skip the next 2 dc, work 2 dc in the next space; repeat from * around ending slip stitch in the top ch of the beginning ch 3. (You will have 40 groups of 2 dc) DO NOT SLIP STITCH AT THE END OF ROUND 12.
13 (Decrease round): Sc in the top ch of the beginning ch 3 & place marker for first sc, draw up a loop in each of the next 2 dc, yarn over & draw through all 3 loops on hook (1 stitch decreased), *1 sc in each of the next 2 dc, draw up a loop in each of the next 2 dc, yarn over & draw through all 3 loops on hook; repeat from * around to the last dc, sc in the last dc. Do not slip stitch at the end of the round. (60 sc)
14 – 18: Sc in the first sc (place marker), sc in each sc around. Do not slip stitch at the end of the rounds.
At the end of round 18 slip stitch in the first sc & fasten off.
NOTE: If the hat band is too small you can always increase stitches evenly around in round 14.
I hope you enjoy the Granny Crochet Beret Hat and if anyone has any questions you can leave me a comment below or on Instagram!