
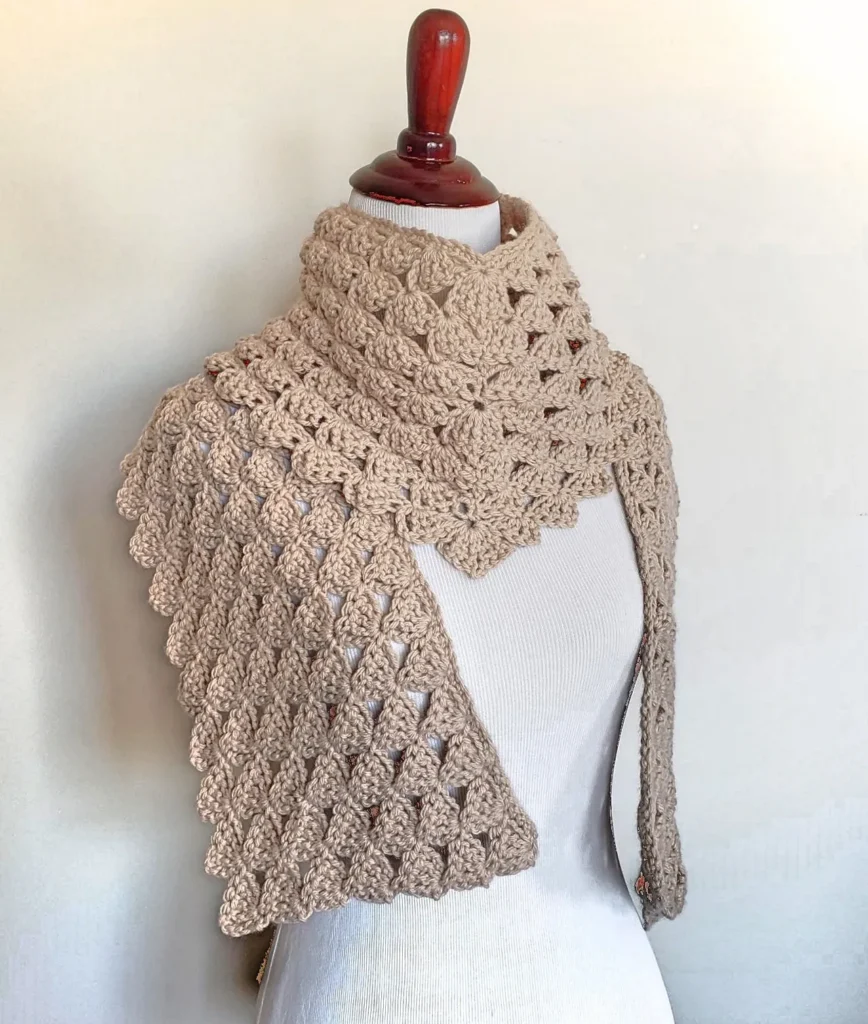
Free Crochet Scarf Pattern: The Drifting Shells Scarf
I am so excited to finally share The Drifting Shells Scarf with you! I have been crocheting this lightweight scarf for years, but I never got around to writing down the actual pattern. My neighbor, who also crochets, finally forced me into sitting down and typing it out because she loves the design so much!
This easy crochet scarf pattern is incredibly versatile. It can be worn casually with jeans or dressed up for a night out, making it the perfect accessory for any season. The texture from the crochet shell stitch gives it a gorgeous, elegant look without being complicated.
If you are looking for a quick project, this is it! It’s a very easy crochet pattern for beginners that consists of only 13 rows.
Scarf Size & Customization
- Finished Length: Approximately 60 inches
- Finished Width: 6 inches
- Design Note: This scarf is designed to be skinny and long, but you can easily customize the width to make it a wider wrap if you prefer.
Beginner-Friendly Step-by-Step Photos
Because I want this to be a stress-free project, I’ve tailored the layout based on reader feedback! If you are just beginning or have a hard time reading crochet patterns, I have included helpful step-by-step pictures to guide you. Instead of putting the images at the very end of the post, you will find the pictures directly below each row so you can check your work as you go.
Drifting Shells Scarf Pattern Details
Materials Needed:
- Yarn: Lion Brand Pound of Love in Sugar Cookie (or any medium weight #4 yarn that meets gauge)
- Crochet Hook: Size J (6 mm)
- Notions: 2 stitch markers, tapestry needle
Gauge:
- 14 sc = 4 inches
Crochet Abbreviations (US Terms):
Hint: Before starting, make sure you are familiar with standard stitches like single crochet (sc) and double crochet (dc) to create the shell stitch texture.
DIRECTIONS:
Ch 210
FOUNDATION ROW
– Sc in the 2nd ch from hook and in each ch across. Turn. (209 sc) It should measure about 60 inches.
PATTERN ROWS
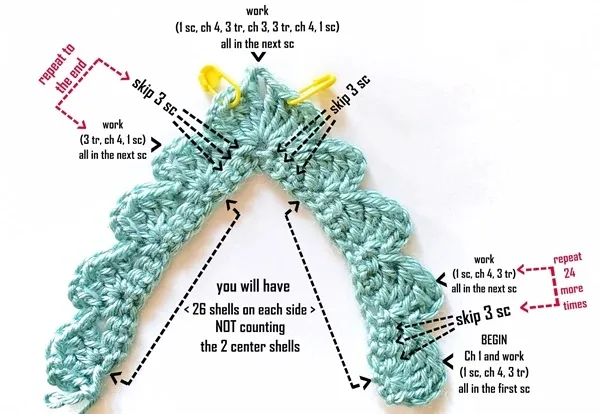
1: Ch 1, sc in the first sc, ch 4, work 3 tr in the same first sc (shell made), *skip 3 sc, work (1 sc, ch 4, 3 tr) all in the next sc; repeat from * 24 more times (you will have a total of 26 shells), skip 3 sc, work (1 sc, ch 4, 3 tr, ch 3, 3 tr, ch 4, 1 sc) all in the next sc (place a marker on each of the 2 shells just made to mark this as the 2 center shells), ** skip 3 sc, work (3 tr, ch 4, 1 sc) all in the next sc; repeat from ** across to the end (you will have 26 shells from the start of the ** repeat). Turn.
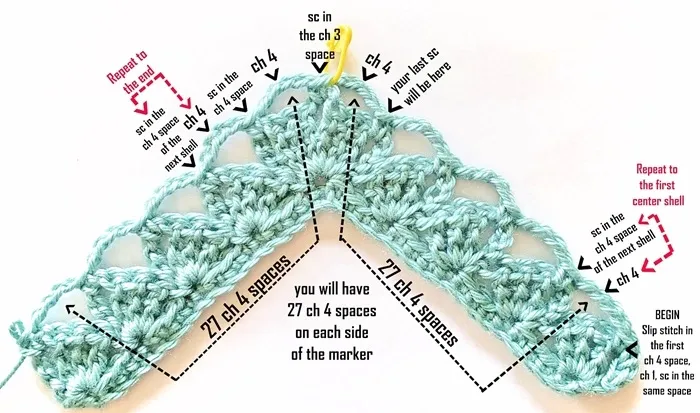
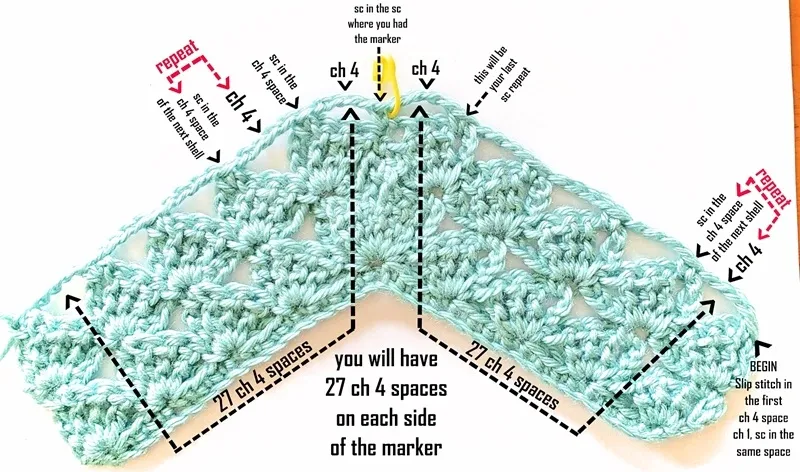
2: Slip stitch in the first ch 4 space, ch 1, 1 sc in the same ch 4 space as the slip stitch, *ch 4, skip the next 3 tr, skip the next sc, sc in the ch 4 space of the next shell; repeat from * across to the first center shell where you placed a marker (you will have 26 ch 4 spaces as of now), ch 4, skip the next 3 tr, sc in the ch 3 space between the 2 center shells (place marker on the sc), ch 4, skip the next 3 tr, sc in the ch 4 space of the next center shell, **ch 4, skip the next sc, skip the next 3 tr, sc in the ch 4 space of the next shell; repeat from ** across to the end (you will have 27 ch 4 spaces on each side of the marker). Turn.
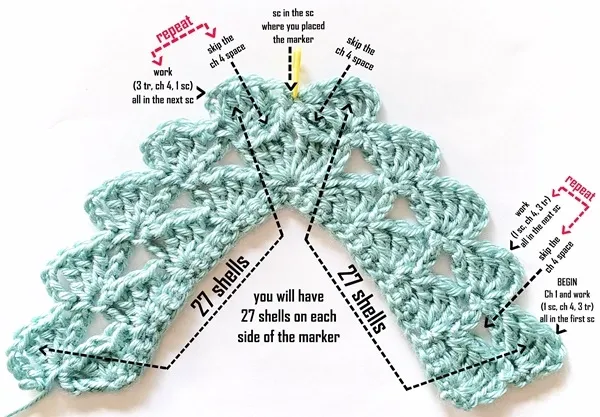
3: Ch 1, sc in the first sc, ch 4, work 3 tr in the same first sc, *skip the ch 4 space, work (1 sc, ch 4, 3 tr) all in the next sc; repeat from * across to the sc where you placed a marker (you will have a total of 27 shells as of now), sc in the sc where you had the marker and place marker on the sc just made, ** skip the next ch 4 space, work (3 tr, ch 4, 1 sc) all in the next sc; repeat from ** across to the end (you will have 27 shells on each side of the marker). Turn.
4: Slip stitch in the first ch 4 space, ch 1, 1 sc in the same ch 4 space as the slip stitch, *ch 4, skip the next 3 tr, skip the next sc, sc in the ch 4 space of the next shell; repeat from * across to the sc where you placed a marker (you will have 26 ch 4 spaces as of now), ch 4, skip the next 3 tr, sc in the sc with the marker & place marker on the sc just made, ch 4, skip the next 3 tr, sc in the next ch 4 space, **ch 4, skip the next sc, skip the next 3 tr, sc in the ch 4 space of the next shell; repeat from ** across to the end (you will have 27 ch 4 spaces on each side of the marker). Turn.
5: Repeat row 3.
6: Repeat row 4.
7: Ch 1, sc in the first sc, ch 4, work 3 tr in the same first sc, *skip the ch 4 space, work (1 sc, ch 4, 3 tr) all in the next sc; repeat from * across to the sc where you placed a marker (you will have a total of 27 shells as of now), work (1 sc, ch 4, 3 tr, ch 3, 3 tr, ch 4, 1 sc) all in the sc where you had the marker (place a marker on each of the 2 shells just made to mark this as the center shells), ** skip the next ch 4 space, work (3 tr, ch 4, 1 sc) all in the next sc; repeat from ** across to the end (you will have 27 shells on each side of the 2 center shells). Turn.
8: Slip stitch in the first ch 4 space, ch 1, 1 sc in the same ch 4 space as the slip stitch, *ch 4, skip the next 3 tr, skip the next sc, sc in the ch 4 space of the next shell; repeat from * across to the first center shell where you placed a marker (you will have 27 ch 4 spaces as of now), ch 4, skip the next 3 tr, sc in the ch 3 space between the 2 center shells (place marker on the sc), ch 4, skip the next 3 tr, sc in the ch 4 space of the next center shell, **ch 4, skip the next sc, skip the next 3 tr, sc in the ch 4 space of the next shell; repeat from ** across to the end (you will have 28 ch 4 spaces on each side of the marker). Turn. (This is the same row as row 2 except you will have 1 more ch 4 space on each side. It is the same picture as for row 2).
9: Ch 1, sc in the first sc, ch 4, work 3 tr in the same first sc, *skip the ch 4 space, work (1 sc, ch 4, 3 tr) all in the next sc; repeat from * across to the sc where you placed a marker (you will have a total of 28 shells as of now), sc in the sc where you had the marker and place marker on the sc just made, ** skip the next ch 4 space, work (3 tr, ch 4, 1 sc) all in the next sc; repeat from ** across to the end (you will have 28 shells on each side of the marker). Turn. (This is the same row as row 3 except you will have 1 more shell on each side. It is the same picture as for row 3).
10: Slip stitch in the first ch 4 space, ch 1, 1 sc in the same ch 4 space as the slip stitch, *ch 4, skip the next 3 tr, skip the next sc, sc in the ch 4 space of the next shell; repeat from * across to the sc where you placed a marker (you will have 27 ch 4 spaces as of now), ch 4, skip the next 3 tr, sc in the sc with the marker & place marker on the sc just made, ch 4, skip the next 3 tr, sc in the next ch 4 space, **ch 4, skip the next sc, skip the next 3 tr, sc in the ch 4 space of the next shell; repeat from ** across to the end (you will have 28 ch 4 spaces on each side of the marker). Turn. (This is the same row as row 4 except you will have 1 more ch 4 space on each side. It is the same picture as for row 4).
11: Repeat row 9.
12: Repeat row 10.
NOTE: The next row is your final row so there is no need to place a marker UNLESS you want to make it wider and continue repeating rows.
13: Ch 1, sc in the first sc, ch 4, work 3 tr in the same first sc, *skip the ch 4 space, work (1 sc, ch 4, 3 tr) all in the next sc; repeat from * across to the sc where you placed a marker (you will have a total of 28 shells as of now), work (1 sc, ch 4, 3 tr, ch 3, 3 tr, ch 4, 1 sc) all in the sc where you had the marker (no need to place markers unless you want to make it wider than shown in the picture), ** skip the next ch 4 space, work (3 tr, ch 4, 1 sc) all in the next sc; repeat from ** across to the end & fasten off (you will have 28 shells on each side of the 2 center shells).
All finished! If you do want to make the scarf wider continue with rows 8 – 13 keeping in mind you will be increasing 1 shell and 1 ch 4 space on each side of the marker for every repeat of rows 8 -13.
I hope you all enjoy your new Drifting Shells Scarf and I would love to see some pictures of your finished project!