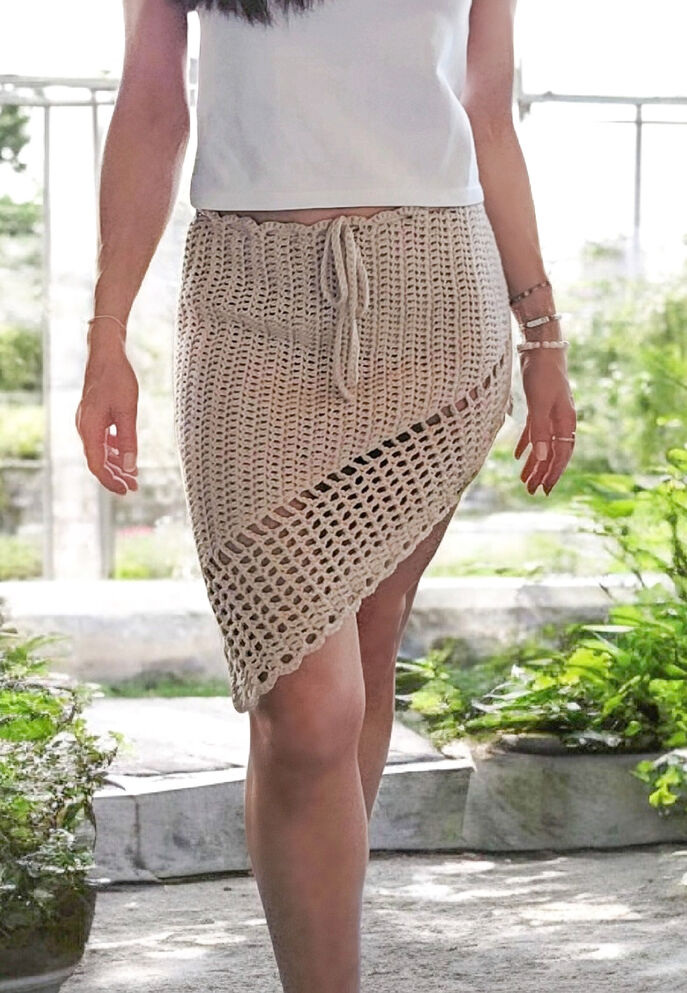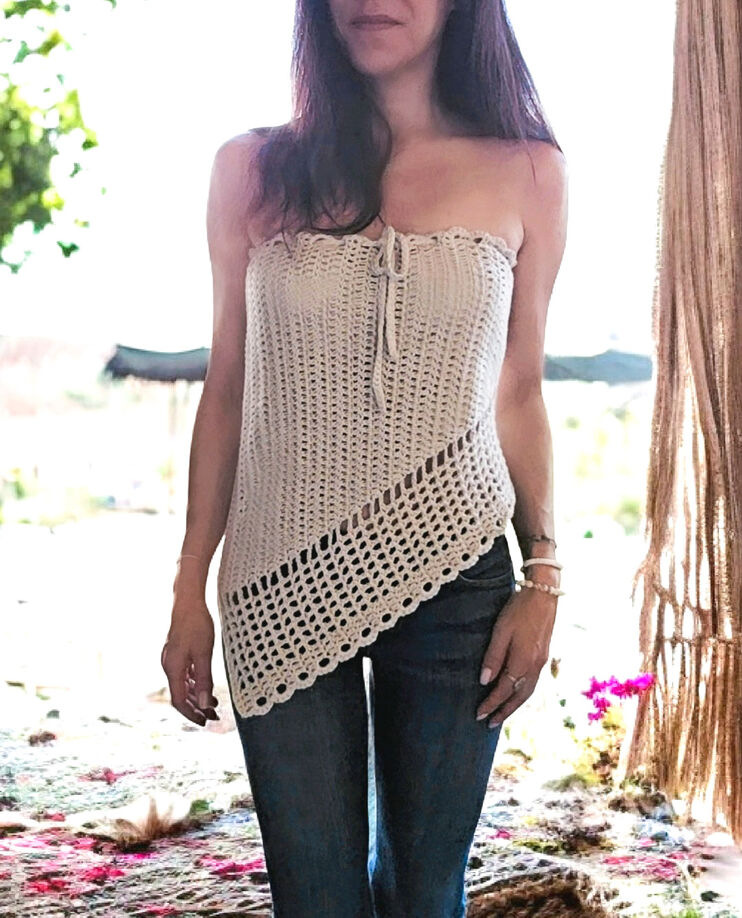
Asymmetric Mesh Tube Top or Skirt Crochet Pattern
Why settle for one wearable when you can have two? Here is the free crochet pattern for the Asymmetric Mesh Tube Top or Skirt. It’s a very easy & fun pattern that can be made for any size! Wear it as a cinched tube top for a night out, or shimmy it down as a mesh skirt for a beach day. Both ways look great!
If you are going to wear it as a skirt the waist will be slightly big because the measurements go by your chest size. For example, if you crochet the 34” chest size the waist of the skirt will also be 34”. It looks nice either way because the drawstring will fix that issue (The drawstring is a must for this pattern because it will keep the top/skirt secure and prevent it from falling down).
The top is worked sideways so the beginning chain is the starting length which is measured from under your arm (by your armpit). The beginning length is the same for all sizes which is about 11 inches. You will be increasing one stitch every row, so as you crochet it will get longer. The larger your chest size the longer it will get.
The top is crocheted in two identical pieces (front & back) & then seamed at the end. Now let’s get to the Asymmetric Mesh Tube Top or Skirt pattern!
MATERIALS:
- Medium weight yarn. I used Hobby Lobby I Love This Cotton in Parchment in the picture.
- Size I (5.5 mm) crochet hook.
GAUGE:
14 sc = 4 inches.
ABBREVIATIONS (The pattern is in US terms):
- ch: chain
- sc: single crochet (UK double crochet)
- dc: double crochet (UK treble crochet)
NOTES:
- The beginning chain 3 counts as the first dc throughout the pattern so you will be skipping the first stitch (the base of the ch 3) and working into the second stitch. I will remind you every row by specifying “skip the first stitch”.
- At the end of each row you will be working the last dc in the turning chain space instead of the top chain of the turning ch 3. This will create a hole which will be used for the borders.
DIRECTIONS (MAKE 2):
Ch 42 (for all sizes)
FOUNDATION ROW:
Sc in 2nd ch from hook and in each ch across to the end. Turn (41 sc)
ROWS:
1: Ch 3 (counts as first dc throughout the pattern), skip the first sc, dc in each of the next 19 sc, ch 3, skip 3 sc, dc in the next sc, (ch 1, skip 1 sc, dc in the next sc) 7 times, dc in each of the last 3 sc. Turn
2: Ch 3, skip the first dc, dc in each of the next 3 dc, (ch 1, skip the next ch 1 space, dc in the next dc) 7 times, ch 3, skip the ch 3 space, work 2 dc in the next dc (1 stitch increase made), dc in each dc across ending dc in the turning ch 3 space. Turn
3: Ch 3, skip the first dc, dc in each dc until you reach the last dc before the ch 3 space, work 2 dc in the last dc before the ch 3 space (1 stitch increase made), ch 3, skip the ch 3 space, dc in the next dc, (ch 1, skip the next ch 1 space, dc in the next dc) 7 times, dc in each of the next 2 dc, dc in the turning ch 3 space. Turn
Repeat rows 2 & 3, increasing 1 stitch every row, until you reach your desired width ending with row 3. In the picture I made it 17 inches wide to fit a 34 inch chest width.

FINISHING ROW:
Ch 1, sc in each of the first 4 dc, (sc in the next ch 1 space, sc in the next dc) 7 times, work 3 sc in the ch 3 space, sc in each dc across ending sc in the turning ch 3 space.
Do not fasten off. Now we are going to work across the top of the piece and do a quick border. At the top you will have all the turning ch 3 spaces and sideways dc. We are going to hide those turning ch 3 spaces and use those holes to weave the drawstring through.
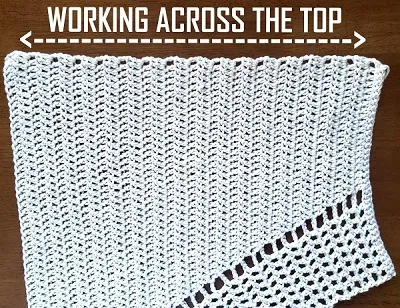
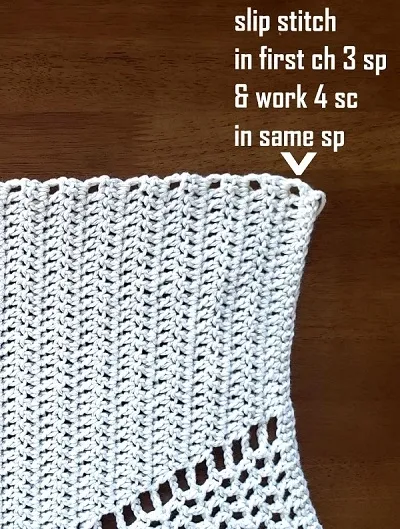
– Slip stitch in the first turning ch 3 space, ch 1, work 4 sc in the same ch 3 space, *slip stitch in the next sideways dc, work 4 sc in the next turning ch 3 space; repeat from * across the top and then fasten off.

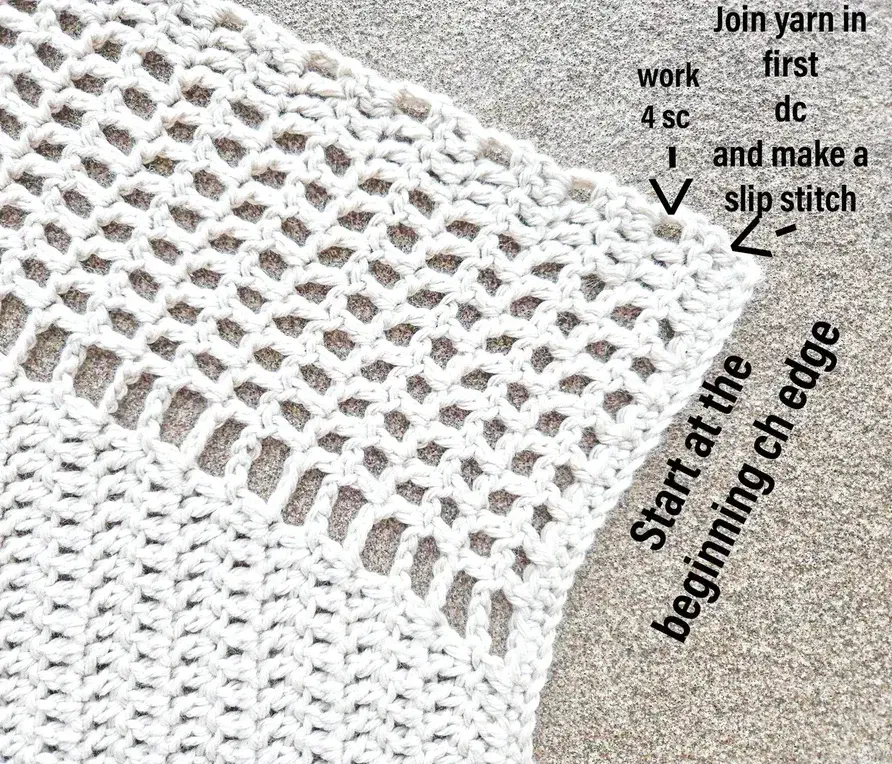
BOTTOM BORDER (It is going to be the same border as the top but it begins differently).
Starting at the shorter end (where you began the pattern), join your yarn in the first sideways dc and make a slip stitch, * work 4 sc in the next turning ch 3 space, slip stitch in the next sideways dc; repeat from * across the bottom and then fasten off.
DRAWSTRING:
Ch 210 for regular sizes, ch 240 for plus sizes
– Slip stitch in 2nd ch from hook, slip stitch in each ch across to end & fasten off.
Weave the drawstring through all the holes at the top of the piece.
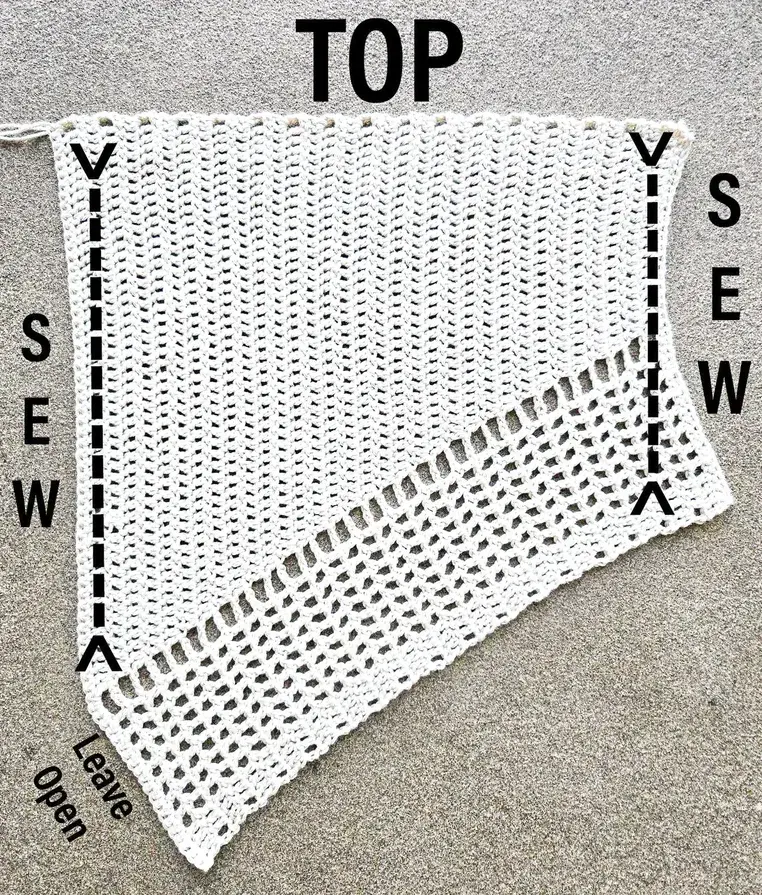
SEWING THE SIDE SEAMS (You can use any method you are comfortable with to sew them. I used the mattress stitch method with the wrong sides facing me)
- Lay the 2 pieces on top of each other & sew the seams as shown in the picture.
I hope everyone enjoys the pattern and I would love to see any finished projects! Do you love it as a skirt or top? Let me know!